Monday, April 22, 2013

Blog Winner

Hello Everyone!

Welcome to our blog.  We are happy to announce that our judges have chosen a winner for the blog contest.  The winner of our blog wins some great new goodies from Graphic 45 and Bo Bunny.  We are pleased to show you our winner in the following picture.  Come on by the store to pick up your prize.  Thanks to all of you who participated!


Check out the use of the color and layers in this project. Absolutely beautiful!!  Our winner even used the color swatch that we provided in the project itself.  Very clever!  Hope you all enjoy this as much as us!

Tuesday, March 26, 2013

Creative Challenge #2

Welcome back Everyone!  We want to announce our monthly challenge for April.  We are announcing it early so you have lots of time to design your project.  This month, we are providing you with a color pallet to use for your project.  We want you to use the following picture to create a scrapbook page, card, or project.  Remember to be creative and have lots of fun with it!  You have until April 19th to get your projects in.  You can enter by dropping your project off at the store, posting to our Facebook page, or leaving a link to your project in the comment section of this post.  We will announce the winner of the contest on Monday, April 22.  The winner will get fun prizes from Bo Bunny and Graphic 45.  Have fun and good luck!!


Thursday, March 14, 2013

Show and Tell Time

 Good Morning all!  Today we want to share a bunch of new cards we created using lots of new stamps and dies that we have in the store.  These cards are featured in our first card class of the month.
First off, we have the card to the left which features two great new Easter stamps from Magnolia.  Magnolia stamps have lots of great detail.  Check out the Easter eggs!
We also used scallop circle dies and an ornate frame die from Sizzix.  The butterflies on the card were cut using a new Spellbinder die. 
 The second card features a new stamp set from Darcie's.  These stamp sets are clear mount and come in a set with lots of great images, which gives you a variety of stamps and endless card possibilities.  The tab on top of the tag that pulls out of the pocket is a new punch from We R Memory Keepers.  This punch punches tabs and comes with plastic holders for the tab if you want to use them on file folders.  It's definitely a handy punch to have!
 The next card features a cute stamp from Stampabilities.  This stamp is part of the House Mouse family of stamps.  We have this and lots of other great House Mouse stamps in store now. 
We also used the new chevron embossing folder from Sizzix to create the embossed pattern along the upper left of the card.  The embossed folder was also dyed orange using Spiced Marmalade Distress Ink to give the embossed image some flair.
 The fourth card features a stamp from a new company we have just taken on in stamps.  The gnome and saying on the card come from Woodware Stamps.  These stamps also come in clear mount sets that have various sayings and images. 
We also used a leaf punch from EK Success to make all of the silver fronds you see around the flowers on the card.
 Our next card features one of our favorite stamp companies, Stampavie.  These three chicks are a super cute stamp for Easter.  We also have other festive Easter stamps from Stampavie.  Stampavie stamps are all individual clear mount stamps.
Our last card features the new paper collection, French Country from Graphic 45.  We used lots of great paper layering to make this card.  We added dimension to the card by making pinwheels.  These pinwheels were made using a new punch from Fiskars that punches out the entire pinwheel.  All you have to do is fold the pinwheel spokes over to make the pinwheel.  It's super easy to use and makes pinwheels a snap to make.

We hope you enjoyed our product and card show and tell.  See you all soon!!

Wednesday, March 13, 2013

Fun Stamping Technique


Hello Everyone!  Welcome!  Today I want to talk to you about a fun technique that can help make your projects one of a kind and that is super easy to do.  We are going to learn how to use a basic stamp and archival ink to give a project dimension and texture.  I am going to walk you through this technique and tell you how I applied it to the frame above. 
First of all, you will notice the above frame looks like it has brown lacy demask print on it.  I actually created this lace effect using a damask stamp from My Mind's Eye and Coffee Archival Ink from Ranger. 
You will first of all need to get out your frame or project and paint it using acrylic paint of your choice.  I used Raspberry Adirondack Dabber Paint to paint my frame.  Allow the paint to dry completely before proceeding.  This should only take a few minutes.
Next, get out a stamp of your choice that you would like to use to give your frame a textured look of some sort.  You may use damask like I did or choose to use any other stamp (maybe flowers, dots, wood grain..any stamp you like).  You will also need the Archival Ink of your choice, just make sure your ink color is dark enough to be seen once you stamp it on the painted object.  Take your stamp and ink it up with your Archival Ink and stamp it directly onto your painted object.  You will do this multiple times so that your entire project is covered with stamped images.  Allow the ink to dry so that it doesn't smear. 
This technique will give your project the look of texture.  It's super easy and quick to do!  You can use this technique on anything you can stamp, it doesn't have to be a painted surface.  You can stamp all over a card to make a fun background, stamp around a piece of paper to make a border, absolutely anything....the sky's the limit!  Hope you had fun learning about this technique!

Monday, March 4, 2013

The Winner Is....

Good Morning all!!  Welcome back!  We are pleased to announce the winner of our first blog contest this morning.  Before we do though, we want to thank all of you who participated.  Our judges had a hard time deciding which of the projects was the winner, but after much discussion they chose the project that best represented the elements of the photo.  So to refresh everyone, this was the picture the projects were based off of:


The project could have one element or all of the elements in the photo.  The project could be a layout, card, or altered art project.  We are pleased to say we had all of these types of projects represented.  So, without further ado, here are pictures of our winner's project.  The judges felt this project best represented the picture.

This is our winning project which is a 12x12" page.  This page used all of the elements from the photo, plus incorporated added touches to make the project pop. 

Check out the layers of the flowers and the beautiful quilling.

Cute accent bugs added to make the project truly pop.

Layered chevron washi tape to give the background a nice touch.
The winner of this contest will receive a stack of paper from the C'est La Vie collection from Bo Bunny, plus fun embellishments from the collection as well.  If this is your project, please come by the store anytime this afternoon or this week to claim your prize.  Congrats to our winner!!!

Monday, February 18, 2013

Inspiration Giveaway

Hello all!  Welcome back! I want to apologize to you all for not posting for a week.  I was down with the nasty cold/flu bug all of last week.  So to make up for a week of nothing, we are going to have a giveaway!  Woohoo!  We want you to use the picture below and draw inspiration from it to create a card, project, or layout.  You can use the color scheme, elements from the photo (like the chevrons, etc.), or whatever else you can think of.  To enter, send me a picture of your project to either our e-mail address at appscrapbooknook@gmail.com, post a link to your blog or gallery in our comment section, or drop your project off at the store.  We will choose the winner and you will receive a prize package of the new C'est La Vie collection from Bo Bunny.  You have until Friday, March 1, 2013 to enter.  We will post the winner on the blog the following Monday.  Good luck and have fun!  Here's the picture:


Wednesday, February 6, 2013

Love Letters

Buttons, brads, and jewels..oh my!
 One of our favorite companies is Bo Bunny.  They always make some of the best and innovative products out there in a great array of color.  For Valentine's Day this year, Bo Bunny has used a fun color combination of aqua, black, pink, and red to make the 'Love Letters' collection.  This collection is full of great embellishments and lovely paper.  Please check it out!
Rub-ons and die cuts perfect to add to cards, pages, and projects.

Sticker sheets to add a little pop.

Dimensional chipboard and stickers.  

Some of the fun paper from the collection.  Love the scrabble tile paper!

12x12" Chipboard sheet

More fun paper from the collection. Check out all of the journal sheets!
We hope you enjoyed a peek of our new paper today.  Make sure to check back to see some more fun new products and great tutorials.  Have a great day everyone!!

Monday, February 4, 2013

The Princess and Her Frog

Happy Monday to all!  Welcome to the blog for another day of fun.  One thing that we are always creating around the Nook are cards.  Today's feature is a sneak peek from our card class tomorrow afternoon.  This card features all sorts of fun die cut, brads, and a great new stamp from SWALK Stamps. 


 This stamp is super fun to color.  We used Copic Markers to color her.  She is stamped using Jet Black Archival Ink.  She has lots of detail, so you can get in lots of practice blending your Copics. 

In class tomorrow we will be creating this card, a cracked glass card, a fun venetian blind card, and a card that uses Gamsol.  Come by and check them out!  We also want to invite you to stop by later this week to see a fun card tutorial here on the blog.  Stay tuned!!

Thursday, January 31, 2013

Pickled Pear

Rub-on for the collection.
 One of our favorite paper companies here at the Nook is Kaisercraft.  We love all of their paper and fun embellishments.  Today we are proud to present Pickled Pear!  This is a fun new collection from Kaiser that features a touch of vintage mixed with a little spring.  The collection features light yellow, green, warm browns, light blue, and a touch of white.  We absolutely love it!  Make sure to check out the 12x12 album just below, which is something new that Kaiser is doing to match their collections.  These albums are a 3-ring style album, so they are easy to add more page protectors to.  We hope you enjou!

The new 12x12" 3-ring binder album.  Love it!!

12x12" paper from the collection

Gorgeous stamp that matches the collection.

6 1/2"x6 1/2" paper pad

Wednesday, January 30, 2013

Wonderfully Stampendous

Check out the funky ruby slipper stamp and the fairies in the field!
 Hello friends!  Welcome.  Today we have a sneak peek of all the fun new stamps we are using on upcoming projects.  These are all new wonderful stamps from Stampendous.  They are cling mount stamps that you can use with your acrylic blocks.  They are wonderful to use if you want to do a lot of coloring.  We recommend using them with Copic Markers to make gorgeous images.  Please scroll down through the stamps and check them all out!
A gorgeous grape cluster and fun carnation bunch!!


These are some fun mini animal stamps!  Gotta love baby animals frolicking!

These are large stamps that would be perfect on a scrapbook page.

Love the orange blossom stamp! The morning glory is beautiful.
Baby lion and bicycle hippo!


 This is a card that I made using one of the new Stampendous stamps.  The image is colored using Copics.  The background was created using the embossing resist and Dylusions ink we talked about on the blog yesterday.  I used Bubblegum Pink Dylusions Ink Spray.  Hope you enjoy!!


Tuesday, January 29, 2013

Dylusional Tuesday

Hello all!  Today we want to tell you a little about one of our favorite new goodies. Ranger has teamed up with Signature Designer Dyan Reaveley to create Dylusions Ink Sprays.  This ink is
a dye ink that is very vibrant and created to use on porous surfaces.  They are non-toxic and acid free, so they can be used in scrapbooks, art journals, altered art projects, and any other project you can think of without harming your photo.  The mist comes out in a fine spray and has great coverage.

We absolutely love these mists.  One of our favorite things to do with it is create background resists with them for cards.  To do this technique you need embossing powder, a stamp you can use to create a background with (leaves, flowers, swirls, flourishes, etc.), a heat gun, Versamark stamp pad, and your favorite Dylusions Ink Spray.  First, stamp the image multiple times over a square of white cardstock using the Versamark Ink Pad.  You will sprinkle these stamped images with embossing powder and set them with your heat gun.  Once the powder is set, mist over the top of the sheet with the ink spray.  The embossed part will resist the ink and make a gorgeous background.  If the ink pools or drips, just use a paper towel to sop up the drips.  You can do this to make a background for a card or any other project.

The other really great thing about this product is the colors it comes in.  There are eighteen colors to be exact.  These colors include Cherry Pie, Dirty Martini, Calypso Teal, After Midnight, Funky Fuschia, White Linen, Lemon Zest, Black Marble, Crushed Grape, Fresh Lime, Cut Grass, Squeezed Orange, Melted Chocolate, Postbox Red, Bubblegum Pink, London Blue, Pure Sunshine, and Vibrant Turquoise. 

We hope that we have made you want to go out and try these new mists.  Let us know what you think about them!  Thanks for coming by.

Monday, January 28, 2013

Memo Board Tutorial

Good morning everyone!!!  Welcome to our blog today.  We have a tutorial for you today on how to make a cute memo board.  This memo board is made by Kaisercraft out of MDF.  We will adorn this project using goodies from Pink Paislee's Secret Crush collection.  To begin, here is our supply list that you will need to make this projects:

Kaisercraft Memo Board- SB2037
Pink Paislee Secret Crush 'Love Notes' paper
Pink Paislee Secret Crush Paper Goods
Kaisercraft Champagne Rhinestones
Graphic 45 Ornate Metal Keys
paint brush
foam paint brush
Tombo Liquid Glue
hammer
pliers
Xacto Knife
scissors
pencil
black acrylic paint
Beacon's 3 In 1 Glue


Step 1.  Take out all of the pieces to your memo board, your black paint, and paintbrushes.  You need to paint the edges and flourishes on the back of the board, paint the edges of both the smaller strips, and paint the backs and fronts of both smaller pieces as well.  Allow all of these pieces to dry before you proceed.


Step 2:  Next, you will need to get out your sheet of Pink Paislee paper.  Set the back piece of the memo board on top of this piece and line up the bottom of the paper with the bottom edge of the board, not the flourishes though.  Trace around the edge of the board and then cut out the paper.  Adhere the paper to the board using the Tombo Liquid Glue.  Remember, with this glue you need to smooth it out well and that less is more.  You don't need to be heavy handed with this glue for the paper to stick to the board.  Do any trimming you need to with either your scissors or Xacto knife.  Make sure to trim out the holes in this board as well so that the slots for the little shelf will slide in.  Once covered, the board will look like the picture below.
 Step 3:  Find the little packages of silver metal hooks.  There should be two packs of them.  You will also have a couple of extra hooks in the package in case one of them gets bent or damaged putting them on the board.
For the bottom hooks, measure up 5/8" from the board and make several dots.  Connect these dots with a faint pencil line.  This will give you a guide where to put the hooks in at.  For the hooks, you will need to evenly space them out along the pencil line.  You can either do this free form or measure the board and evenly space the hooks.  The hooks will screw into the board.  To start these hooks into the board though, you will need to lightly hit them with a hammer.  If the hooks bend a little as you hit them, don't worry because you can straighten them out with your pliers.  Once the hooks are all the way in, they may also go all the way through to the back of the board and stick out a little.  This is okay since the back will be against the wall.  If you don't want them to stick out on the back at all, just unscrew the hooks a tad.
For the top hooks, set the memo pad on the board where you want it to hang.  Use the pencil and make dots where the holes of the memo pad is.  This will give you a guide for these two hooks.  Once all the hooks are in it will look like the photo above.

 Step 4:  We will now put the little shelf onto the board.  Find the piece that doesn't have the scalloped edge and push the slotted edge into the holes on the back board.  Once this piece is secure, push the slotted edge of the scalloped edge piece into the holes of the previous piece.  This will create a cute shelf to hold pens on.  You may also need to touch up the paint on the shelf, so do this now if you want and allow to dry.  Slip your memo pad onto the board as well.  Check out the photo to the left if you need help.
 Step 5:
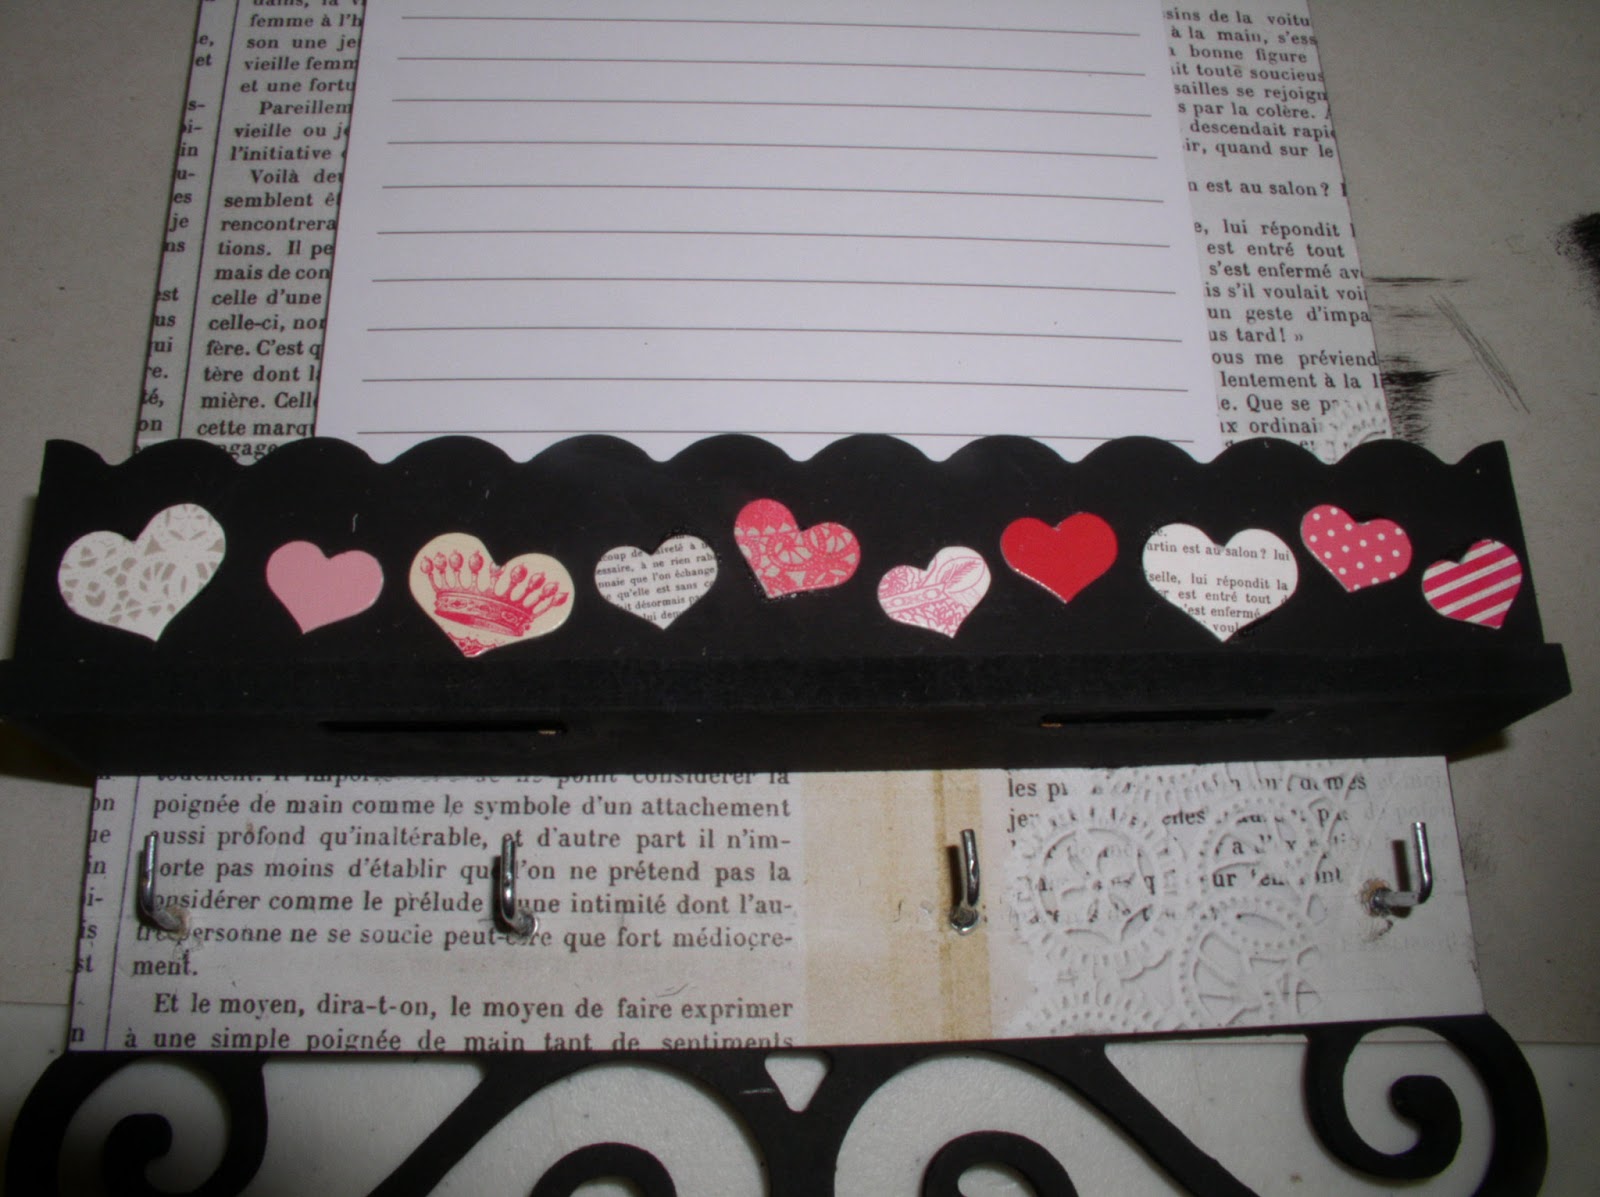
1.  Take out your package of the Pink Paislee Secret Crush Paper Goods.  Find ten small hearts in this pack and glue them along the front of the scalloped piece on the shelf.  I adhered these hearts using the Tombo Liquid Glue.  The photo at the right will help you with this step if you need a guide.

 Step 6:  Pick out five of your favorite tickets from your Paper Good pack.  Adhere them along the top of the board at fun angles, overlapping one another.  There are lots of fun tickets in this pack, so choose the ones that are most to your taste.  Check out the photo to the left to see what I chose.
 Step 7:  Find your package of the Graphic 45 Ornate Metal Keys.  Choose three keys out of this pack and adhere them randomly along the top of the board.  The keys will overlap the tickets.  Check out the placement of my keys in the picture to the right.  I adhered my keys on using Beacon's 3 In 1 Glue.
 Step 8:  Find your package of Kaisercraft Champagne Rhinestones. You will stick five of the largest rhinestones to the swirls on the bottom of the board.  Stick three of the largest rhinestones to the swirls on the top of the board.  You will also stick one of the medium rhinestones to each of the scallops on the front of the scalloped shelf piece.  You can see where to place the rhinestones in the picture above and the pictures to the left.  This is your last step. Yea!!

The photo above is the board all finished up.  Feel free to change it up however you like or add other things to your board.  Remember, there is no wrong way to do papercrafting!!  Thanks for stopping by.