Saturday, April 6, 2019

The Winner Is....

Happy Saturday Blog Friends!

I finally got pictures taken of our entrants into our blog challenge for March.  We wanted to showcase their talent here on the blog.  Remember, this was their inspiration for the projects:


Our first entrant made a trio of fun cards.  Her inspiration was the color scheme with a touch of floral happiness. 


Our next entrant created this gorgeous drawing for us.  This image is hand sketched and colored using different mediums. 


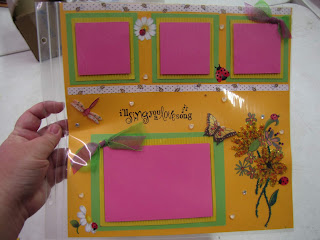
Our third entrant made this awesome layout using various paper crafting techniques and products. 


So, without further ado, our winner is........

entrant #3!!  Here is some close ups of her work.  We chose this piece because it uses various paper crafting techniques and products in creative ways.  Check out some of the details:


Thank you so much to all of our entrants.  We had a very hard choice deciding who our winner was this month.  You are all so talented and we hope that you enter again next month.  If you entered, you projects can also be picked up for you to take home at any time.  Have a fabulous weekend!!

Thursday, April 4, 2019

Yes...I'm Late...the April Blog Challenge

Hi all,

I'm so sorry we are late this month with our challenge picture!  April has already been super busy and we are only four days in.  So, without further ado, here is our blog challenge photo for the month:


Please use the above photo for inspiration to create a layout, card, or other paper crafting project.  You will have until May 4 to get this one in since I was a few days late posting our image.  Drop your project off at the store to enter anytime before this date.  This month you will win a prize package of new goodies from Graphic 45.  This pack will include some great paper and embellishments you can use for your projects! Yea!

We can't wait to see what you create!  Check back here tomorrow and we will announce the winner from last month's blog challenge. 

Thursday, March 7, 2019

February Georgia Blue Card

Hi everyone!

Welcome back to part two of our Georgia Blue Card series.  Our February card features a combination of technique and gorgeous embellishments.  Here's what you will need for this card:

1- piece of Moody Blue cardstock from Bazzill
1- Prima Georgia Blue Midnight Blues paper
1- sheet Bazzill Smooth White cardstock
1- package Georgia Blue Flowers products #636609 (this includes the stencil)
Stamping Bella Fairy Tale Squidgies Stamp
Hickory Smoke Distress Oxide Ink Pad
month chipboard (exclusive to Scrapbook Nook)
vintage lace ribbon
Georgia Blue Crystals
Copic Markers
fine point green marker- I recommend Pitt Pens for this from Faber Castell.
Dark Blue Nuvo Glitter Marker
Tuxedo Black Memento Ink Pad


Here's what you do to make this card:

1.       Cut a 7x10” piece of the Moody Blue cardstock.  Turn so that the 10” length is horizontal and score at the 5” mark.  Fold.  This is the base for your card.  
2.       Cut a 4 ¾”x6 ¾” piece of the Georgia Blue Midnight Blues paper.  Adhere to the front of the card, centered.  
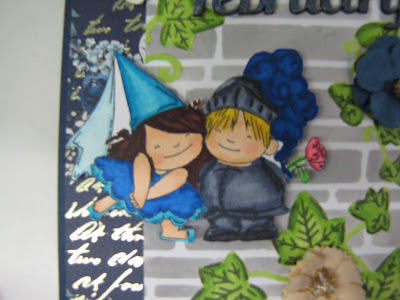
3.       Cut 3 ½”x4 ½” piece of white cardstock.  You will use this piece with your stencil from the flower pack.  Put this stencil over the paper and scotch tape the stencil in place so it can’t shift.  Ink over this piece with Hickory Smoke Distress Oxide to get the bricks.  Leave the stencil in place and use a Pitt Pen to draw in the veins on the leaves.  I chose an olive green shade of pen.  Take the stencil off.  Color in the leaves and vines with your Copics.  Please see photo if you need help.  Adhere this piece to the right, lower middle of the card.
4.  Take out your stamp of the Squidgies(the larger of the two sizes in the package).  Stamp and color them with your favorite markers and cut them out.  Adhere to the left middle of the card using foam squares.  
5.       Take out the February word from your chipboard pack.  Color this piece with a dark blue Nuvo glitter marker.  Adhere to the upper right of the stone background. 
6.       Choose three flowers from your flower pack and adhere around the wall with vine square as you like. 
7.  Cut a piece of your lace ribbon.  Adhere to the bottom of the card and trim to fit.
8.       Stick five navy crystals along the lace ribbon, evenly spaced.  


We hope you enjoyed the next card in our series!  See you soon for the next card in our series!

Monday, March 4, 2019

February Blog Contest Winner!

It's that time of month!  We have our official winner of our blog contest from February.  If you missed it, we chose this picture for our challenge inspiration:


Our lucky winner, Kristin, made this beautiful card using a combination of ink, paint, gorgeous Prima paper, cardstock, and a few jewels.  Check out her creation:


Thanks to Kristin and all of our participants.  Please check out this month's inspiration picture.  Make sure to get your projects by March 31.  Good luck!!

Sunday, March 3, 2019

Sunda Funday How To: Georgia Blue January Bestie Card

One of our favorite recent projects was our series of twelve cards we created using the new Georgia Blue collection from Prima.  The challenge was to make a monochromatic set of cards, even for months that traditionally aren't in that monochromatic scheme.  We had so much fun creating these cards that we decided to share them on our blog as a how to, listed with the products you need to create them.  So, to kick this off, we are going to start with our January card.  Here's what you will need to create this card:

"Winter Snowflake" stamp from My Besties
1- sheet of Bazzill Ash Cardstock
1- sheet smooth white cardstock
1- sheet Vintage Double Dot Shadow Cardstock from Bo Bunny
1- sheet Prima Georgia Blue "The Watermark" paper
1- package Georgia Blue Flowers- product #636609
small snowflake punch
1- Georgia Blue Crystal Pack
1- Georgia Blue Flower Pack- product #636630
Carabelle Background Flocons Stamp
Paris Dusk Ink Pad from Momento
Tuxedo Black Ink Pad from Momento
Seaglass Stickles
Twinkle Stickles
Blue Bayou Stickles
Month Chipboard Words- exclusive to Scrapbook Nook
Mystic Turquoise Alchemy Wax from Prima
Blueprint Sketch Distress Oxide Ink Pad
Mermaid Lagoon Distress Oxide Ink Pad
Tumbled Glass Distress Oxide Ink Pad
Kraft Mat
Spray Bottle
Inktense Pencils
Clear Wink of Stella Pen
Copic Markers


1.  Cut a 7x10" piece of the gray cardstock from Bazzill.  Turn so that the 10" length is horizontal and score at the 5" mark.  Fold.  This is the base for your card.
2.      Cut a 4 ¾”x 6 ¾” piece of the Bo Bunny cardstock that is gray with polka dots.  Adhere to the front of the card, centered.  
3.       Cut a 4 ½”x 6 ½” piece of the Prima paper that is white with tan and gold flecks in the corner.  Before I adhered this  piece to the card, I stamped a snowflake background stamp in the upper left corner of the paper at an angle using Paris Dusk Ink from Memento.  Adhere this piece to the front of the card, centered.  
4.       Cut a 3 ½”x 4 ½” piece of the gray polka dot cardstock and adhere to the lower right of the card.  This is a mat for your stamped image.  
5.       Cut a 3 ¼”x 4 ¼” piece of the gray cardstock and adhere to the middle of the polka dot mat from the previous step. 
6.  Take out your Bestie stamp, your white cardstock, and Tuxedo Black Ink.  Stamp your Bestie on a 3x4" piece of the white cardstock. Color your stamped image with a combination of Copic Markers and Inktense Pencils.  I used the Inktense Pencils on the Bestie's dress.  Choose a blue pencil you like and add it, fairly heavily, to the places you want dark tones on the dress.  You will then take your Clear Wink of Stella marker and pull the ink outwards, away from where it is dark, to color the rest of the dress.  These pencils allow you to use one color and blend it out by adding a water based product or by using a water brush.  Before you adhere this piece to the mats, you will need to oxide the edges with Distress Oxide from Ranger.  I used three colors: Blueprint Sketch, Mermaid Lagoon, and Tumbled Glass.  Make sure to dry the piece in between colors. If you have never worked with Distress Oxides, you will need a kraft mat, the spray bottle, and the three ink colors.  Rub the ink colors onto the kraft mat, one at a time.  Spritz the color with water so that the ink beads up.  Dip the edge of the stamped image piece into a color and dry before you apply the next color.  Adhere this piece to the mats, centered.  
7.  Punch three small snowflakes using the Bo Bunny Vintage Shadow Dot paper.  Adhere them randomly around the Bestie image as you like.  
8.       Stick a dark blue rhinestone to the middle of each snowflake piece.  
9.       I also added Twinkle Stickles to the bubbles on the Bestie image to give a little sparkle.  
10.   Take out your chipboard pack and find the January chipboard piece.  Color this piece metallic blue.  I used Turquoise Wax from Prima to do this.  Adhere the piece to the bottom of the card underneath the Bestie image.  
11.   Find your flower pack that comes with the stencil and choose two of the white/ivory flowers.  Adhere one to the upper right corner of the Bestie and one to the lower left corner of the Bestie.  I also added Sea Glass Stickles to these two flowers.  
12.   Take out three small flowers from your other Georgia Blue pack.  I used two navy and one tan colored flower.  Adhere one of the navy flowers to the upper right of the Bestie and the other two to the lower left of the Bestie.  I also used Blue Bayou Stickles on these small flowers.  

Enjoy making this fun card and we hope you enjoyed part one of our Georgia Blue card series. 

Check back tomorrow to see the winner of our February blog challenge!

Friday, March 1, 2019

Hoping For Spring


Good morning blog friends!

Here in Southwest Colorado we are ready for spring...which seems to be holding off for awhile since we have more snow in our forecast for the next couple of weeks. 

So, even if the weather won't cooperate, we decided to bring spring to our blog and monthly inspiration contest.  This month we want you to use this fun picture of flowers to use as your inspiration to make a card, layout, or other paper crafting project for our monthly challenge.  All you have to do is bring the project by the store.  Make sure your name is on it and we will display it in the store.  All entries must be in by March 31.  You can also enter if you don't live in Durango, just e-mail your pictures of your project to scrapbooknook@outlook.com.  This month's prize is a set of watercolors from Prima Marketing.  These sets retail for $30 and are so much fun to use on all of your crafting projects. The winner of our challenge will also be posted on our blog. 

Make sure to check back here on Monday as well.  We will have the winning project from our last monthly challenge.  Thank you to those of you who entered and we can't wait to see what you create this month!

Have a great weekend!

Thursday, January 31, 2019

Time for A New Contest


Hi all!!

Welcome to the re-launching of our blog! It has been awhile since we have updated and we want to kick things off with an amazing contest. 

One of our favorite things here at the Nook is seeing what our customers create with all of the beautiful products that they buy in our store.  We love all of your creations...from scrapbook pages to albums to cards and everything else in between.  So, because of our love for your creations, we want to offer you all a chance to win a $30 gift certificate to the store! Woohoo!

How, you ask, do I win this gift certificate to buy amazing things?  Simple.  We want you to use the above picture and make a project that inspires you.  You don't use the picture itself of course, but something that it inspires in you.  Maybe it's the color scheme in the picture, the gorgeous night sky, the open air...whatever it is, use it.  Make a scrapbook layout, card, album, or some other paper crafting project and then drop it off at the store anytime in February.  We will display the projects and take pictures of what you create and share here in March.  The projects will be judged by our special judge and the winner will be announced.  The lucky winner will win the gift certificate.  Woohoo!!

A couple things...make sure you put your name on the back of the project and make sure you get them to the Nook by February 28.  No submissions can be made after that day!  The winner will be announced on March 2.

Happy crafting and we can't wait to see your projects!